Saturday, August 20, 2011

Porcelain Pendant PART I

While visiting Mandy's blog; Beads for Brains 365 , I ran across her completed Porcelain Pendant.  She credited the creater and posted a link back to her blog; Kreatív vagyok .
The tutorial had lots of photos but being in Hungarian it made it difficult to figure out just what the photos were implying.
With perserverance I was able to figure out how to make this pendant, granted it may not be the exact same instructions as Kreatív vagyok but the out come is the same.

My directions are designed for the beginner and I've gone into great detail ... in other words the more experienced and advanced beaders may find these directions redundant in many places. Please bear with me as I can remember all too clearly how frustrated I was as a newbie beader with instructions that assumed I already knew all the basics. :)
The List of Materials :
Your standard medium weight beading threads such as Nymo, Silamide, Fireline, etc.  (I like to use 6 lb. Fireline for mine).
Thin beading needle
Sicissors
Thread conditioners or beeswax if you normally use it
BEADS:
32 Round 4mm beads
Size 3mm Firepolished crystal beads,  32 if you want them all in the same color or 24 of one color for the outer sections and 8 of a different color for the inner section, if you want a look similar to the one in my tutorial.
Size 11/0 round seed beads again you may use all one color or divide them like the firepolished beads.
Note - You may use Swarovski crystals for this pattern but it does create a slightly different look to the pendant as the 3 mm Swarovski bicones are not as long as the 3 mm Firepolished  beads.
Basically the foundation of this pendant is created with right angle circles.  The large center cirlce of 8 beads is surrounded by 4 medium and 4 smaller circles.


PENDANT FOUNDATION :
Cut a length of beading thread aproximately 2 to 3 yards long.  Condition thread if you wish.
Pick up and string 8 beads leaving a tail of thread about 8 to 10 inches long.

Pass needle back through all 8 beads to create a circle.


Pass needle through the first bead (#1) again so that the working thread is exiting one side of this bead and the tail thread is exiting the other side of this same bead.
The beads in my photos are numbered in the order they were strung.  You will notice that your working thread is coming out of the 1st bead from left to right, I find this akward so at this point I flip my work.

In the next photo we will pick up 3 of the 4 mm round foundation beads and pass our needle back through this 1st bead again.


You have just made the 1st small circle.  Now go through the next bead in the circle, bead # 2.

You will now need to pick up 4 of the 4mm beads and position your needle to pass through beads #9 and #2.


photo above ... needle has already pass through bead #9 and is proceeding through bead #2.
As you tighten the thread you'll notice that you've just created another circle, the first of the medium sized circles and that it has used beads in both the smaller and the large circle to make it a complete circle.  Pass needle through the next bead in the large circle, bead # 3.
Pick up 2 of the 4mm beads and pass through the side bead, bead #12, in your newly formed circle.

Bring the needle over and through the next bead of the main large foundation circle, Bead # 3, and draw thread up tightly.

Another small circle has been completed. 

Travel over to the next bead in the large circle and pass the needle through this bead,        Bead # 4. 

Pick up 4 of the 4mm round beads.

Bring needle through the side bead of the newly formed small circle, Bead # 16 and then through  Bead #4 in the large main circle.  Pull  thread tautely and another medium sized cirled is now completed.

We repeat this basic proceedure again, going through Bead # 5 in the main large circle.

Pick up 2 of the 4mm beads and pass through Beads # 18 and #5.


The 3rd small circle is now complete and like in previous steps we travel through the next bead of the large main circle, Bead #6.
Pick up 4 more of the 4mm beads and now pass needle through the side bead of small circle, Bead #22 and then through Bead #6 of main circle.


At this stage we are 75% through our foundation piece. The last small cirlce is made like those before, passing needle through Bead #7 of the main circle ...

picking up 2 of the 4mm beads and then going through the side bead, Bead #24, of medium circle and through Bead #7 of large circle.

To me it now resembles a heart shape.  The last circle is going to be a little different as 3 beads of the circle of 6 are already in place ... these are beads # 8, 11 and 28. 

So now you'll pass the needle through Bead #8 of the main circle and up through Bead #11 of the small circle made earlier.

Since we already have 3 of the beads needed for the last med. sized circle, we only need to pick up 3 of the 4mm beads to complete this circle.  Bring needle down through the side bead, Bead #28 ...

Pass needle through the last bead of the main circle, Bead #8

and then back up through Bead #11

The foundation is now complete.  After doing this a couple of times the pattern becomes very simple and  repetitive.

NEXT COMES THE EMBELLISHMENTS WHICH MAKES THIS PENDANT EXTRA SPECIAL.
I will post that very shortly as this post has already taken a lot of time to put together ... so excuse me while I take a bit of a breather. :)

PART 2 EMBELLISHMENT OF PENDANT IS NOW AVAILABLE - CLICK HERE
ps ... If you click on the photos you'll get a larger picture which may help if you're having trouble reading a bead number or trying to figure out where the thread is exiting from.


Thursday, August 18, 2011

Tutorial is on the Drawingboard ...


Recently I asked if there was an interest in my creating an English version of an Hungarian tutorial on the making the beaded Porcelain Pendant.  The requests received may not have been considered a deluge but the enthusiasm that they contained more than made up for the lack of volume.  For these lovely and enthusiastic individuals I will be posting a tutorial on how to fabricate this pendant but, like all tutorials, it will take a bit of time.  I've discovered that the most time intensive part of the tutorials are the photos. In the time it took to photo each step and then edit the photos I know I could have made up a very nice stash of these pendants. 
For those of you who heartily expressed a desire for this tutorial I beg your patience as I put it together.

Today I'll leave you with a little tip that I like and I realize that it is nothing new or Earth shaking but if there is even just one person that reads this and thinks " Hey that's a good idea" ... well then I've accomplish one small miracle called happiness. :)
Almost 10 years ago I discovered some neat picinic plates at my local big box store and I could not help but think how useful they would be for organizing a beading project.  All those cute little dividers to keep the baked beans from running into one's potato salad or retain the coleslaw from merging with Aunt Edna's apple cobbler.

Needless to say I purchased 4 of them and now wish I had purchased at least 4 more.  I find these are the perfect "lap size" and I can use them to bring a project from my craft mess (er I mean room) into the living room where I can watch TV or just be sociable as I bead.   Since the suface of these picnic plates are shiny slick plastic, I use a cloth or a beading mat as a cover so my beads don't roll all over the place. 

Tuesday, August 16, 2011

It's The Thought That Counts ... Right ?


Sisters are special, they share a certain bond between them and even through the bickering and teasing there is a love that usually grows stronger with time.  My sisters and I have long stopped exchanging gifts for those yearly occasions such as Christmas and birthdays, not because we care less about one another but simply because our own families grew and gift giving became rather expensive.  As they say; "It's not the gift that counts but the thought" and a simple card, note, phone call was enough to say we cared and that the other was and is always in our thoughts.

August is my baby sister's birthday and though I seldom sent a gift this year I just wanted to.  I had made a spiral rope necklace and thought she would love to have one. 
Photo above ... The spiral rope necklace in the warm tones that inspired me to try to make a version for my sis in her colors with round hematite beads as a core.  It bombed but maybe I'll try again with an hematite oval or seed bead core.
The rope I made was in warm colors of golden topaz, rainbow rootbeer, and silver lined gold, very pretty but not in the cool colors that my sis loves and wears.   When I attempted to make the necklace using perfectly round beads as the core of the spiral ... well it just didn't look the same ... not as neat ... too much thread showed.  After several attempts I changed my plans and made a beaded pendant that I saw on Mandy's blog  BeadsforBrains365  , Mandy found the pattern on Kreatív vagyok .   The directions are in Hungarian but after several attempts I discovered the path of the thread and was able to make what I think is a lovely pendant in my sister's color palette. 

It's in my sister's colors and I have my fingers crossed that she will love it ... if not ... well it's the thought that counts ... right ?
Photos above and below ... Pendant in hematite with fire polished beads in silver and crystal vitrail, topped with seed beads in luster green tea and pearl shell white.

Photo above and at top of post feature the new "torso" mannequin that I purchased on ebay recently.  It's nice but seems to have a pronounced orange peel texture to it ... can mannequins have cellulite ?

If there is enough interest expressed, I might sit down and make another tutorial featuring this pattern. :)

Friday, August 5, 2011

Wired Up

Artistic Wire has been available for a number of years and though it came in an assortment of rainbow colors it was only recently that I discovered the beautiful finish called Non-Tarnish Brass.  Unlike the copper or bronze finish wire, the Non-Tarnish Brass has a lovely gold tone to it that works well with gold fill or gold plated findings. 
photo above ... Artistic Wire spools and my recently finished spiral beaded necklace
My first introduction to Artistic Wire was back in 2005 when I purchased a 12 spool assortment in jewel like colors for a beading course that I had signed up for.  The course required  very fine  wire at either 24 to 26 gauge.  Not normally a gauge that I would have much cause to use.  
In recent years Artistic Wire has introduced several new metal finishes that coordinate with the newer metals of today's chains and findings. 
Photo above ... close up of my handmade clasp and extender chain, made from Artistic Wire in non-tarnish brass.
Though I love the color the one downside is its non tarnish coating.  Unfortunately since the non-tarnish finish involves a clear coat of some substance (acrylic or vinyl?) it didn't take kindly to my flattening it with a hammer on a bench block.  I noticed that some of the clear coating chipped off during this process.  In the future I will have to forgo work hardening a piece and also make sure to use Tool Magic on my pliers to help protect this coating
If anyone makes wire findings or does wire wrapping I'd love to hear how you handle wire that has this protective coating on it.  Is there a clear sealant that one can use to "re-seal" this coating if it is scratched or chipped?

Monday, August 1, 2011

Heat Stroke ...

photo above ... So hot we have to shade the cuttings that we're  growing.
At 8:30 this morning the temperature was almost at 90 and with yesterday's heavy rain the humidity was even higher.
John, my hubby, had decided to transplant a shrub, a crepe myrtle,  that wasn't doing well in the spot where we had planted it.  We thought it might do better in a different location but I was in no big hurry to do the transplanting and really thought it could wait until fall and cooler weather.  But John has never been one to procrastinate and he was also one that never liked to just sit back, do nothing and just chill out.  I've often teased him saying, "If you sat down for 5 minutes with nothing to do, I think your head would explode."
photo above ... Newly transplanted crepe myrtle bush.

With a heat index of at least 100 degrees outside I wasn't at all surprised to see John busy with a shovel digging a hole in which to transplant our sickly shrub.  There really wasn't much I could help him with but I did my best to be of some assistance and once the planting was complete I encouraged him to come into the cooler temperatures within our house. 
"Right after I fill in the hole where the shrub used to be" was more or less his response.  

Time ticked by and as I was putting clean, fresh sheets on the bed, John appears at the bedroom door, he's looking ghostly pale, his eyes are glazed over and perspiration is dripping from him. His clothes were so saturated that I could have wrung the perspiration from them.  "I need to lay down" he mumbled "could you toss a towel on the floor for me?".  Since I had just changed the bedding I took the old sheets and quickly spread them on top of the bedroom carpeting.  I had seen him do this once before ... heat exhaustion or heat stroke.

 Right now the important thing was to bring his body temperature down.  As John laid down I rushed and got a frozen Popsicle for him and went and soaked a few towels in cold tap water.   Quickly I placed the cold wet towels under his armpits and wiped his face and neck with another.  I repeated this procedure several times, praying that I wouldn't have to call 911. 
Slowly he began to lose  that "almost at death's door" pallor and that distant, glazed look vanished.  Soon he could sit and sip a glass of cold water and a few moments later he was able to stand up and get into a cool shower. 
photo above ... Temperature reading as of 4:25 pm 8/1/2011 (taken in the shade of the overhang of our back patio).  Sorry that the thermometer is so grungy but it is outside and this is Florida where anything that stands still long enough gets moldy.
As John can attest, heat exhaustion comes on quite suddenly.  He had gone to fill in the hole where the crepe myrtle had been ... found he needed more dirt so had to get another shovelful from the dirt pile.  Then once the hole was filled he decided to mulch over it as it had been in the flowerbed and then, still feeling fine,  he went to cleaned up the gardening tools that had been used in the transplanting.  With the tools cleaned, he stepped inside the house and that's when it hit him like a wrecking ball.  He felt faint, nauseous and weak in the knees.  Fortunately we were able to get his body temperature cooled down and didn't require the assistance of 911 ... twice ... and I hope there will never be a third time !

It's summer, the temperatures are hotter, in most places, than they've ever been.  One must use caution when working outdoors, don't over exert yourself, drink lots of liquids and simple pure water is the best of liquids.  Even if you're feeling "fine", don't push it. You can either take a break and finish whatever it is a bit later or even finish it the following day.

Thursday, July 28, 2011

Cabin+Cub blog GIVEAWAY


Just spreading the news and the joy.  Valerie at Cabin+Cub is back in the swing of things and having  a lovely giveaway ... a set of her adorable mini note cards.  So cute and cheerful! What a lovely way to send a thoughtful greeting to a friend. 

 As a lot of us know Val is now a mommy and her little one,  cuter than a button and sweet as pie,  is now a frolicking one year old who keeps her pretty busy so it takes a lot of time management and juggling to find time to craft, do shows, run an etsy shop, blog and also have a wonderful giveaway ... uh, did I forget to put in "and also have a life?"  :D

So please head on over to Cabin+Cub and enter Valerie's giveaway ... drawing will be held Aug. 5th, hurry as we all know how time flies.

Monday, July 25, 2011

Beaded Sultan Bead Tutorial - Part 2

This is the continuation of the Sultan's Turban beaded bead as promised.
(Click Here for Part One of tutorial)

Row 4.) Pick up 1 seed bead, one 4 mm bead, 1 seed bead, one 4mm bead and 1 seed bead (this first group will be the only one that has 3 seed beads and two 4mm beads in it).  See photo # 21.
Go back through your 6 mm bead and then through the 6mm bead next to it.  See photo #22.
Pick up 1 seed bead, one 4 mm bead and 1 seed bead.  Pass needle down through the 4mm bead and the seed bead below it on the previous group made.  See photo #23
Now go back through the 6 mm bead  that you just exited and continue through the 6mm bead next to it.  Again pick up 1 seed bead, one 4 mm bead and 1 seed.  Pass needle down through the 4mm bead and the seed bead like you did in photo #23 and then back through the 6 mm bead and on through the next 6 mm bead. 

Repeat this pattern around row 4 until you reach the 8th and final 6mm bead, pass needle through this bead.  Photo #26 is bottom of bead so it appears that needle is going through bead from right to left but if the bead is flipped over, the needle would really be going from left to right.

At this point you will notice that you have a seed bead followed by a 4mm bead on each side of this last 6mm bead therefore you do not have to add these beads (see photo # 25).  
Pass needle through the seed bead and 4 mm bead that are a part of the 1st group made, now pick up 1 seed bead and go down through the 4mm bead and seed bead made in the last group ( this seed bead connects this row and completes this pattern).  Photo 27a shows the tip of the needle as gold colored and lets you know the direction of needle through these beads.

Photo # 27 b shows bead from bottom view, note again that needle direction is reversed when viewing from this perspective.
 Pass needle once again through the 6mm bead (Photo # 27 above )
Then up through the 4mm bead and the seed bead of that first group (photos # 28 & 29)  putting you into position to begin row 5. 


NOTE : as you make this round you will notice a web of thread is formed between the larger 6mm beads. Do not be concerned as this will be addressed later.

Row 5.)  This row will be work like row two, the only difference is that row 2 forms a flatter snowflake shape while this row will be pulled up into a cone-like shape. 
Pick up 3 seed beads, go back through the base seed bead and then through the next base seed bead.   (Photo # 31)

Pick up 2 seed beads pass needle down through the side seed bead of the picot just formed and return through your base seed bead and then over through the next base seed bead.   (Photo # 32)
Since you're not working this flat it may be hard to keep track of your base seed beads, be sure to keep track making sure that you've created a picot above 7 of the base seed beads.   (Photo # 33)

When there is only one seed bead remaining, the 8th one, pass needle through it and notice that this last bead is flanked on both sides by beads and only needs 1 bead to complete the picot. (see X in photo 34)

Bring needle up through the side seed bead of the 1st picot made (photo # 35)

Pick up 1 seed bead and pass needle through the side seed bead of the last picot made (photo # 36). Now go back through the base seed bead.
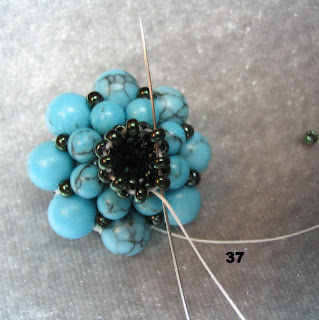
You have finished the last picot in row 6, to finish this row off bring your needle back up through the side seed bead of the first picot made and then through each of the 8 center seed beads of each picot. This will close up the final row.  (photo # 37)
Work your way down through the seed beads to reach the closest 4mm bead, go through the 4mm bead and the seed bead next to it, pick up 3 seed beads and go across and through the seed bead and 4 mm bead directly across from the beads you've just exited (this will cover up the thread webbing between the larger 6mm beads).  (photo #38)
Go through a seed bead next to the 4mm bead to cross over to the adjacent 4mm bead, pass needle down through this bead and the seed bead below it. Pick up 3 seed beads go through the seed bead and the 4 mm bead directly across from the bead you just exited and repeat this procedure until all spaces between the large 6mm beads have been filled in, covering the threads between them. Finish off your thread as you would in any work and cut.
NOTE:  Sometimes if the seed beads are too small you may need to either pick out larger ones or add one or two in order to fill in this space.
If you are looking for part one of this tutorail please go to: http://abeadersblog.blogspot.com/2011/07/beaded-sultan-bead-tutorial-part-1.html  or
CLICK HERE

Related Posts Plugin for WordPress, Blogger...