Monday, July 25, 2011

Beaded Sultan Bead Tutorial - Part 2

This is the continuation of the Sultan's Turban beaded bead as promised.
(Click Here for Part One of tutorial)

Row 4.) Pick up 1 seed bead, one 4 mm bead, 1 seed bead, one 4mm bead and 1 seed bead (this first group will be the only one that has 3 seed beads and two 4mm beads in it).  See photo # 21.
Go back through your 6 mm bead and then through the 6mm bead next to it.  See photo #22.
Pick up 1 seed bead, one 4 mm bead and 1 seed bead.  Pass needle down through the 4mm bead and the seed bead below it on the previous group made.  See photo #23
Now go back through the 6 mm bead  that you just exited and continue through the 6mm bead next to it.  Again pick up 1 seed bead, one 4 mm bead and 1 seed.  Pass needle down through the 4mm bead and the seed bead like you did in photo #23 and then back through the 6 mm bead and on through the next 6 mm bead. 

Repeat this pattern around row 4 until you reach the 8th and final 6mm bead, pass needle through this bead.  Photo #26 is bottom of bead so it appears that needle is going through bead from right to left but if the bead is flipped over, the needle would really be going from left to right.

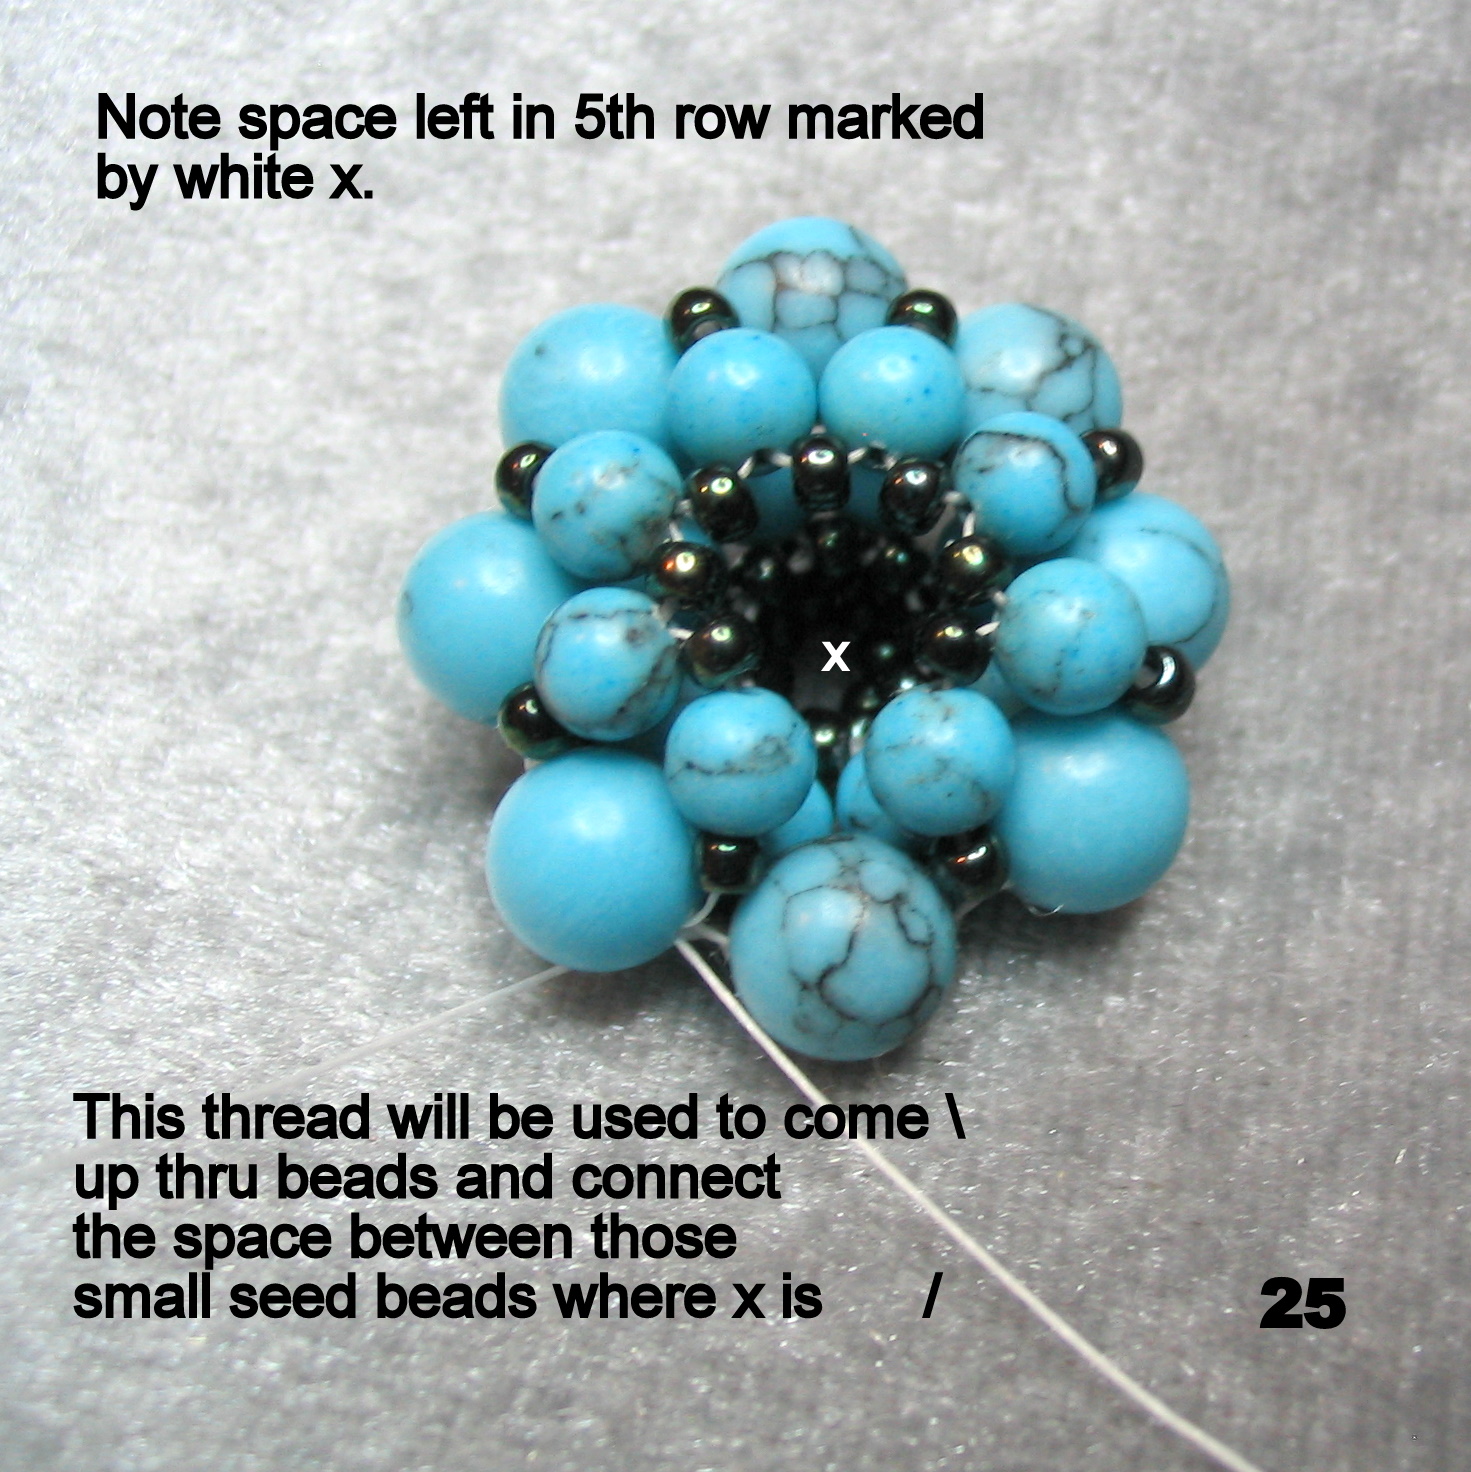
At this point you will notice that you have a seed bead followed by a 4mm bead on each side of this last 6mm bead therefore you do not have to add these beads (see photo # 25).  
Pass needle through the seed bead and 4 mm bead that are a part of the 1st group made, now pick up 1 seed bead and go down through the 4mm bead and seed bead made in the last group ( this seed bead connects this row and completes this pattern).  Photo 27a shows the tip of the needle as gold colored and lets you know the direction of needle through these beads.

Photo # 27 b shows bead from bottom view, note again that needle direction is reversed when viewing from this perspective.
 Pass needle once again through the 6mm bead (Photo # 27 above )
Then up through the 4mm bead and the seed bead of that first group (photos # 28 & 29)  putting you into position to begin row 5. 


NOTE : as you make this round you will notice a web of thread is formed between the larger 6mm beads. Do not be concerned as this will be addressed later.

Row 5.)  This row will be work like row two, the only difference is that row 2 forms a flatter snowflake shape while this row will be pulled up into a cone-like shape. 
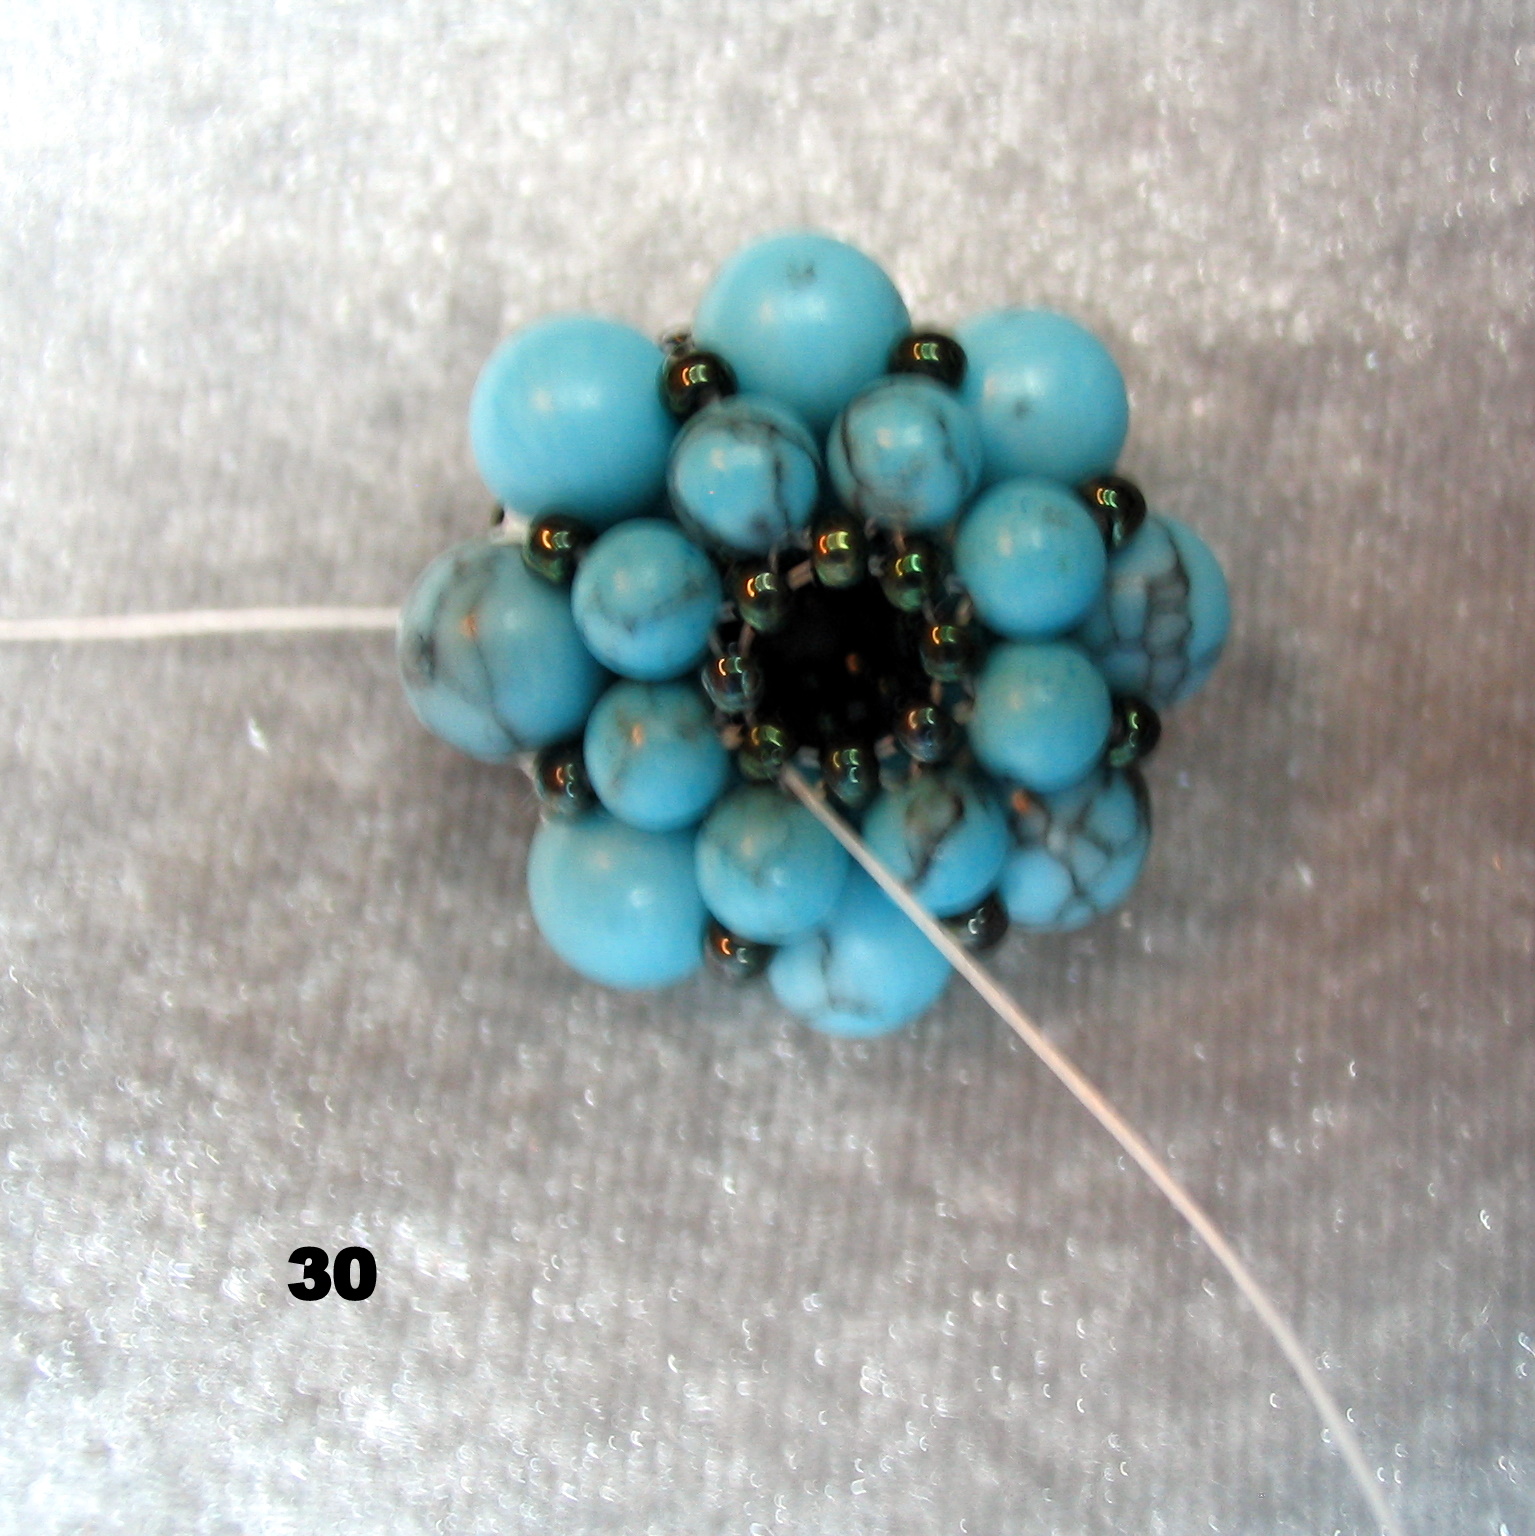
Pick up 3 seed beads, go back through the base seed bead and then through the next base seed bead.   (Photo # 31)

Pick up 2 seed beads pass needle down through the side seed bead of the picot just formed and return through your base seed bead and then over through the next base seed bead.   (Photo # 32)
Since you're not working this flat it may be hard to keep track of your base seed beads, be sure to keep track making sure that you've created a picot above 7 of the base seed beads.   (Photo # 33)

When there is only one seed bead remaining, the 8th one, pass needle through it and notice that this last bead is flanked on both sides by beads and only needs 1 bead to complete the picot. (see X in photo 34)

Bring needle up through the side seed bead of the 1st picot made (photo # 35)

Pick up 1 seed bead and pass needle through the side seed bead of the last picot made (photo # 36). Now go back through the base seed bead.
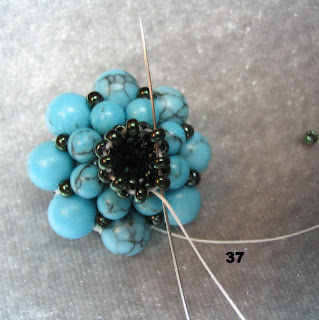
You have finished the last picot in row 6, to finish this row off bring your needle back up through the side seed bead of the first picot made and then through each of the 8 center seed beads of each picot. This will close up the final row.  (photo # 37)
Work your way down through the seed beads to reach the closest 4mm bead, go through the 4mm bead and the seed bead next to it, pick up 3 seed beads and go across and through the seed bead and 4 mm bead directly across from the beads you've just exited (this will cover up the thread webbing between the larger 6mm beads).  (photo #38)
Go through a seed bead next to the 4mm bead to cross over to the adjacent 4mm bead, pass needle down through this bead and the seed bead below it. Pick up 3 seed beads go through the seed bead and the 4 mm bead directly across from the bead you just exited and repeat this procedure until all spaces between the large 6mm beads have been filled in, covering the threads between them. Finish off your thread as you would in any work and cut.
NOTE:  Sometimes if the seed beads are too small you may need to either pick out larger ones or add one or two in order to fill in this space.
If you are looking for part one of this tutorail please go to: http://abeadersblog.blogspot.com/2011/07/beaded-sultan-bead-tutorial-part-1.html  or
CLICK HERE

Sunday, July 24, 2011

Beaded Sultan Bead Tutorial - Part 1


Recently I saw an amazing beaded bead on BeadsForBrains365.  Mandy gave the web link  http://manogyongyei.blogspot.com/2009/01/sultan-bogy.html where she had found the pattern, only the instructions were a little sketchy and also in Hungarian.  Did I mention that I don't speak Hungarian, let alone read it ? Searching the web, I took note that there were a number of people that wished to make this same bead but had no luck with the Hungarian instructions ...  soooo ... I sat down and tried to walk my way through the sketches.  After much trial and error  this is what I came up with. 
I hope it will help those who, like myself, could not understand the Hungarian instructions or had difficulty trying to decipher exactly where the path of the threads went in the sketches.  I've also discovered that drawing diagrams of beads and thread paths is exasperatingly challenging.  My hat's off to those intrepid souls who write tutorials.
Due to the length of my instructions I will post in 2 parts.

Materials List : 
Beading Needle and scissors
Beading thread (Fireline, Nymo etc.)
Seed Beads size # 11/0  (round seed beads work best)
16 Round Beads size 4 mm
8 Round Beads size 6mm

About thread ... I prefer Nymo but please feel free to use whichever thread you're most comfortable with.  Since this bead does require some rigidity I recommend that you use a fairly thick thread .  In my version I used Nymo #D and though I used it single strand I did wax  it.  I cut my thread at 2 yards length and it was more than sufficient.

Row 1.) Pick up 8 seed beads on needle and thread them to within 6 or 8 inches from end of thread. Go back through all 8 beads to form a ring coming back through the first bead strung.

Row 2.) Pick up 3 seed beads and pass needle back through the same bead in your foundation ring  This forms a little picot. Picture below.

Pass needle through the next bead in your ring (picture above) and now pick up 2 seed beads (the 2nd bead on your needle will be the center bead of the next picot made).  Go through the side bead of the 1st picot made (picture below)  and then back through the foundation bead (notice that you now have 2 picots formed).  This is basically a Right Angle Weave.


Pass needle through the 3rd bead in the foundation ring, pick up 2 seed beads and repeat the previous step of going down through the newly form picots side bead and back through your foundation bead, then through the 4th bead in your ring.  Continue in this fashion until there is only 1 foundation bead remaining. 
Now pass needle through this foundation bead and UP through the side bead of that very 1st picot made.  Pick up 1 seed bead and go across to the last picot made and pass needle down through the side seed bead and then back through the foundation bead forming the finale picot and joining the second row. 

 
Pass needle back up through the side bead in the 1st picot made in row 2 (See picture above), and then through the center picot bead. (See photo below).


Row 3.)  Row three will begin the sides of the beaded bead and will start curving the bead downward. Pick up one 4mm bead, 1 seed bead, one 6mm bead, 1 seed bead and one 4mm bead.  Pass back through the seed bead that your thread was exiting from.  See picture below.
Bring need through the center seed bead of the next picot and pick up one 4mm bead, 1 seed bead and one 6mm bead.  Go down through the seed bead and the 4mm bead in the previous group of side beads formed.   See picture below.

Repeat this pattern until you reach the last remaining picot, here you will pass through that picot which I will call La Ultima.

(Photo #17) Bring needle up through the 4mm bead and seed bead of the very first group made.Pick up one 6mm bead and (Photo #18) go down through the seed bead and the 4 mm bead of the last group made.
This newly added 6mm bead joins the row and completes the pattern of row 3.  
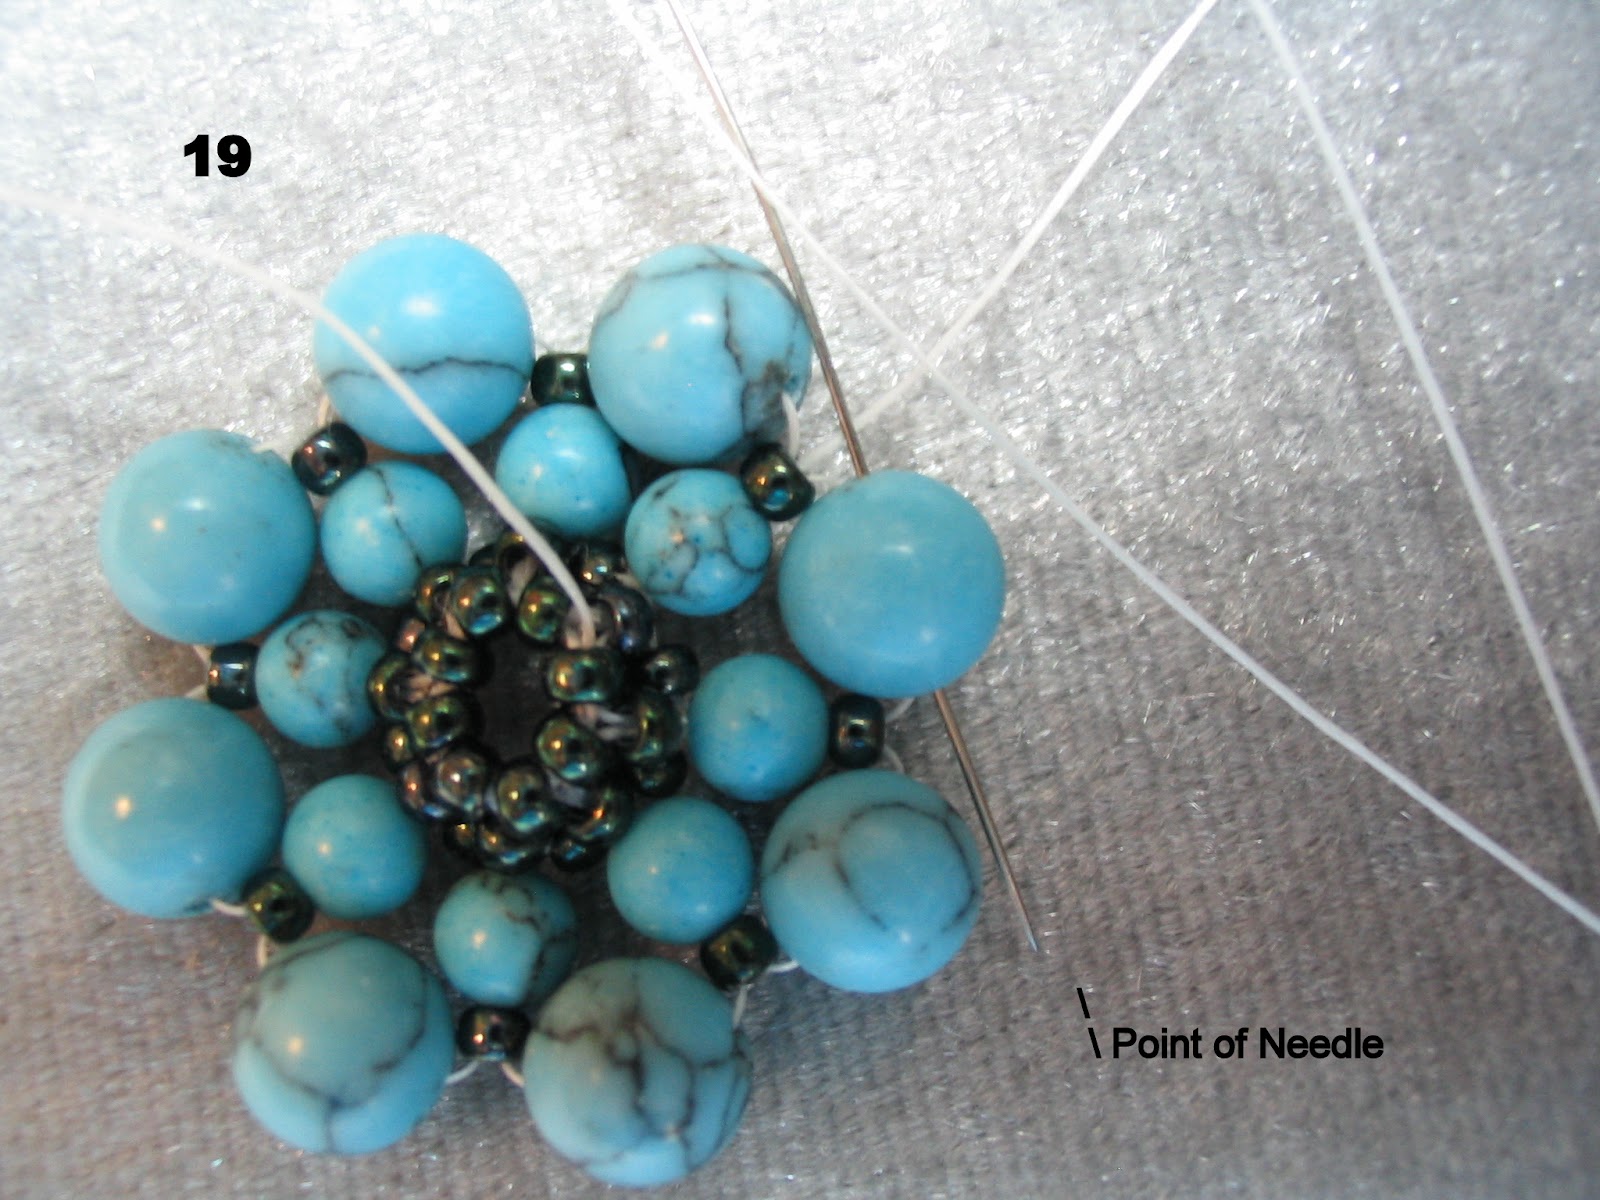
(Photo #18) Pass needle through La Ultima seed bead and up through the 4mm bead and the seed bead in the first group formed in this row.  (Photo # 19)
Now pass needle through each of the 6mm beads to bring them together. (photo oops two #19's, it's been a long day ! See photo below)
 AT THIS POINT WE'RE OVER HALF-WAY COMPLETE.  I will post the other half of the tutorial tomorrow as this one is getting rather long.  Hope you'll check back.


Saturday, July 16, 2011

A Special Drawer for Seed Beads

Photo above - empty seed bead vials and containers

I have a collection of Seed Beads, it may not be the biggest collection but it takes up space and has always proved a challenge not only in how to contain those tiny beads but where to store the containers themselves.
Photos above and Below - A box full of empty seed bead containers.

Fortunately I came up with an idea and, even more fortunately, my dearest hubby was the one that made my idea into reality by creating  the storage space that I needed.  He strongly believes in the saying; "A happy wife makes for a happy life".

This was just a standard drawer that he replaced the glides on making it a full extension drawer.  Then he crafted the wooden shelf insert, which is based upon those spice storage inserts that one can purchase for their kitchen drawers.


Photos above and below - Every inch is utilized and I can see at a glance just what I have.


All those empty containers in that box at the top of my blog are from the beads in these photos.  I've discovered a lovely plastic jar that has a screw on lid, so the past few days I've been emptying old vials, boxes and other containers (even little baggies) of seed beads and putting them into these wonderful jars.  No more spilled beads caused from trying to pull off those annoying snap-on vial tops.  Must admit creating all those labels is what took FOREVER !

Now there's only problem,  I need another drawer just like this one! 

Monday, July 11, 2011

ON RED PINE MOUNTAIN


On a mountain in the state of Vermont rests the farm lands of the blog "Red Pine Mountain". Containing far more acreage than most of us could ever imagine and making my almost 3 acre parcel of land look minuscule in comparison, this bucolic paradise is surrounded by lush forests and dotted with pristine meadows. Red Pine Mountain is home and sanctuary to blogger Sara and her loving mate in life, whom she affectionately calls "Mountain Man". It is also home to Sara’s treasure, a collection of gentle, adorable animals. Sara is an unrequited dreamer and a lover of animals large and small, her menagerie includes horses, dogs and a barnyard of assorted fowl. Each of her gentle creatures displays a unique personality, in much the same way that we humans do, they will both surprise you and make you smile if not laugh.
In this mountain home Sara’s the dreamer but it’s Mountain Man who is her rock, the solidity that allows her to keep her head in the clouds and her feet firmly on the ground, it’s truly a match made in heaven. Together they attempt to salvage an old farm, restore it to its’ past glory and to preserve a way of life that is quickly disappearing.
If you visit Red Pine Mountain, you may witness the miniature horses as they graze in their pasture, leisurely nibbling on the sweet succulent grasses.  Perhaps you’ll spy the antics of Sara’s clever turkeys, guinea hens and assorted chickens, or discover the farm’s latest acquisition such as their new fluffy yellow goslings.
Red Pine Mountain is a blog I love to visit because, for a moment in time, I’m transported to a tranquil oasis, a beautifully verdant retreat where the sky is too blue to believe and the air fresh and fragrant with the perfume of trees, fresh hay and green meadows.
You’re graciously invited to visit as their gate is always open wide and they welcome all who enter there.
If you care to visit there and have not noticed all my highlighted links in my post that would take you to this blog ... or if you would prefer to check it out on your own terms the URL is :  http://redpinemountain.com/ 
I'm confident that you'll enjoy the trip.


Saturday, July 9, 2011

Where Have The Lilies Gone ???

I have returned and you will find that lilies have nothing what-so-ever to do with this post other than they are pretty and cheerful and at the moment there are none to be found in my flowerbeds or my life. 
Were I to say that my blog absence was due to some exotic trip or bold new adventure would be, well it would be an outright lie!  What I've truly been doing for the past several weeks is wallowing in a pit of depression.   Depression self-inflicted in part by self-pity, of bemoaning my lackluster etsy shop and beating myself up over things that I've little or no control over. 

My daughter called me a few weeks ago.  She was in tears and bawling as though her heart would break.  Reason ?  She just found out her oldest son's girlfriend is pregnant.  Bad news? Yes.  Heartbreaking news? Yes. End of the World news?   Not quite. 

My oldest grandson is 21, his girlfriend is slightly younger.  Both have minimal educations and minimal paying jobs.  Yes the pregnancy was an accident, unplanned.  She was taking birth control pills and then was put on antibiotics for a sinus infection.  Guess she didn't read the precautions that came with her meds.  When on a course of antibiotics and taking birth control pills, one should take extra precautions and use an alternative method of birth control.  A fact that obviously slipped under their radar.

It took my daughter a couple of days to get over the disappointment and of course she now understands just how I felt when I found out she, my then 19 year old daughter, was going to be a Mommy.  She was too young to be a mother ... I wanted her to go to college, get a degree ... she had such promise, such potential.  Hell I was too young to be a grandmother !!!!  And now it's come around full circle.  Such is life.  Funny life !  Uncontrollable life ! 

Now what am I going to do ?   What's my daughter,who insists she's going to be a nana and not a granny, going to do ? Well first of all, if she's going to be a nana then I'm going to be a grana.  Next  we'll go shopping for baby items  together and then we'll sit down and start planning a baby shower for our future grandchild and great-grandchild.

We all sit at life's poker table and try to make the most with the cards we're dealt. Sometimes the cards contain a few queens or kings, other times we're lucky to just get a pair of deuces.
Life's too short to fret over things beyond one's power and I've heard it said that if you concentrate on the big things the important matters in life, then all the small things, all that not so important stuff takes care of itself.  True perhaps, but even truer is the fact that no amount of worry is going to make things better.   And so THAT'S MY 2 CENTS FOR WHAT IT'S WORTH.

Friday, June 24, 2011

A Record Breaking High Wire Walk

Wednesday night I watched Nik Wallenda make a record breaking tight rope walk on the Discovery Channel's "Life on a Wire".    I wish I could embed a video for you but for some reason I can't get the blogger video to work ... maybe it's just me or maybe its blogger... again!

I must admit that the information I had gleaned from the June 22nd edition of the Sarasota - Manatee Herald Tribune was not completely correct.  It was stated that the premiere episode of this new reality series would be in San Juan Puerto Rico where Nik and his mother, Delilah, would walk across a 300 foot high wire.  In truth the episode was filmed in the Bahamas where Nik, his family and crew set up his high wire rigging between two high rise luxury hotels ... spanning a distance of 2,000 feet and over 200 feet in the air. 

I held my breath as he went across the wire and can only imagine how suspenseful and terrifying it must have been to watch live from the audience far, far below.  Nik first went across the cable on a bike and then later ventured across this huge expanse on foot and holding a balance pole.  Afternoon tropical winds had picked up, the warning of an approaching storm.  Nik's shirt flapped and fluttered about him but he was on the wire and now committed, there was no turning back. 
Meanwhile, on the ground below, his wife and mother rushed about frantically giving commands to the men holding the stabilizing cables that kept the high wire from swaying.  "Pull back tighter !  See the the way that cable sags?  Lean that way, take that slack out to the cable."  The two women had a lot at stake here, Nik was a husband to one and the father of her children and to the other he was a beloved son.   Both women knew that a fall from such heights meant certain death and the Wallenda family was no stranger to death.  In the past, through 7 generations of Wallendas, there had been several injuries and a number of lives lost in fatal falls ... one of which was a fall that involved a multi person high wire pyramid.  The fear factor was extreme and very real.  Breaths held, hearts stopped until Nik finally reached the safety of the building at other end of the cable.

As I said, I wish I could have embedded a video for you, however I did receive this from Delilah this morning on facebook :

Delilah Wallenda, a circus high-wire acrobat and the seventh generation of the Flying Wallendas circus family, walks across a 300-foot-long wire suspended 100 feet in the air between two towers of the Conrad Condado Plaza Hotel in San Juan, Puerto Rico, Saturday June 4, 2011. Delilah's grandfather, the German-born Karl Wallenda, tried to perform the same feat in 1978 but fell to his death at age 73. Delilah and her son Nik Wallenda commemorated the famous family patriarch by successfully completing the same stunt simultaneously Saturday. (AP Photo/Ricardo Arduengo)http://my.news.yahoo.com/photos/delilah-wallenda-circus-high-wire-acrobat-seventh-generation-photo-193152661.html

FOR SOME REASON THE ABOVE LINK ISN'T WORKING IN BLOGGER I'LL TRY THIS AND KEEP MY FINGERS CROSSED :
DELILAH WALLENDA

Wednesday, June 22, 2011

THE FLYING WALLENDAS !!!

The Flying Wallendas ... they fly through the air with the greatest of ease those daring young men on the Flying Trapeze.
 
Delilah, beautiful, vibrant, light, breezy and clever. It was hard to believe that this lovely woman could actually be a grandmother but the fact was she’s not only a grandmother but a high wire artist as well. A member of the famous "Flying Wallendas" that performed world wide and astounded audiences with their tempts of fate. Perched high above the ground the Wallenda family do their amazing acts of showmanship, flying from trapeze to trapeze, twirling, turning and somersaulting through thin air.  But this is not their only fame, the Wallendas are especially famous for their performances on the high wire, far above the ground and without a safety net. Risky? Definitely !  However these are professionals, the Wallenda are artists that never take their skills lightly, theirs is a life of constant practice, practice and more practice.  Performing high in the air is in their blood and the gene, if one wishes to call it that, is passed on from generation to generation.

In 1978 Karl Wallenda, the patriarch of the Wallenda family, performed in San Juan, Puerto Rico. It would be a performance that no one would forget, one that would make news world wide. Karl would plummet to his death ! 73 years old at the time, Karl was sharp, stable and knew what he was doing, his death was not caused by diminished abilities but by improper rigging.  Rigging is the link between life and death for a high wire artist,  just one cable not in the proper position or not tighten enough could spell tragedy.

I first met Delilah in the early 90’s at the Palm Aire Country Club and Restaurant where she worked as their charming hostess. She was one of those rare dark haired beauties that turned heads when she walked by and whenever her name Wallenda was mentioned people would quip; "Oh are you one of the Flying Wallenda’s ?". To which she’d respond; "Yes I am". You could only imagine the jaws that dropped. "Are you serious?" Delilah would smile ever so sweetly and explained that she is the granddaughter of the famous Karl Wallenda and that , yes, she performs on both trapeze and on the high wire.

Tonight, June 22nd, the Discovery Channel will be airing a new series about "Life on the Wire", a true reality series featuring Karl’s descendants his great-grandson, Nik Wallenda and Nik’s mother, Delilah Wallenda. The first episode airs at 10 PM tonight and will take the audience back to San Juan where the grandson Nik will walk across a 300 foot long cable, stretched across a span between two tall buildings, 100 feet above ground ... Delilah will accompany him.

I intend to watch this show as I’ve never seen Delilah perform before. Though it was well known that at the Wallenda house their backyard was home to a full rig of trapeze and high wire equipment and that at certain times the public could witness them during practice sessions. I was never so fortunate to witness this, each time we drove by their home I’d glance into the tree tops to see the high wire rigging empty but filled with promises of an amazing family with incredible abilities.

If you can I suggest you tune in the program, I have a feeling Nik Wallenda will be making his great grandfather very proud.

Wednesday, June 15, 2011

How to Show Your Ankle ?

Show a little leg ... show a lot of leg! It’s summer and the season is perfect for shorts, Capri pants and short skirts ...  and ankles!  Nothing looks quite so nice as a cute pair of sandals and a pretty ankle sporting an attractive ankle bracelet.


Recently I beaded two anklets and I’m pounding my head against the wall wondering what I should do.   It’s summer in South Florida so local galleries and boutiques have seen a drastic drop in business and, as far as my etsy shop goes, well I could list sterling silver beads and findings all day long and they’d sell like hot cakes ... as long as I list them for almost what I purchased them for ! If I list my jewelry it sits there ignored and no one even gives it a heart. So what to do ?
Photo above ... I beaded this from #11 Delica seed beads in Cobalt blue and Gold adding a picot trim in #15 cobalt blue Charlotte beads.  Wire heart and  extender chain are also handcrafted by me and links are embellished  with light cobalt blue firepolished Czech glass 3 mm beads.  Measures 9.5 to 10 inches depending upon which link is used for the 14k gold filled spring clasp.  Price $16 (includes shipping and handling.)

Photo below ... Sunflowers.  I love sunny, summer sunflowers and I had some pretty matte green Toho glass seed beads that were in the perfect shade of those big, green sunflower leaves.  So using bright yellow seed beads and a glass seed bead color called Rainbow Rootbeer, I beaded a row of happy sunflowers against a lush green background.  It reminds me of the fields of sunflower we drove past as we crossed the state of Kansas.  My handcrafted clasp is made from a perky yellow glass disc bead and has 3 beaded rings that measures from 9 to 10 inches.  The last ring is embellished with a pale yellow glass teardrop bead.  Price $14 (includes shipping and handling) 

MORE PHOTOS BELOW
If anyone is interested you can contact me either through my blog profile or my etsy shop AlmostPrecious and I'd be happy to list it specially for you.


Wednesday, June 1, 2011

Look Ma ... No Thumbnails ....

I've done some dumb things in my life, matter-of-fact I've done a LOT of dumb things in my life. I'm sure I've done enough stupid things that I could dedicate a whole blog to them; "All the stupid, dumb things I've done in my Lifetime Blog".
So what's one more thing to add to the ever growing list ?


I have thin, fragile fingernails and when I do wire work my nails take a beating. I tend to use them as a fulcrum to bend the wire into the "neck" of a loop. After making several wrapped loops using my thumbnail as a bending point I usually end up with a chip or a notch in the middle of the outer edge of my thumbnails. That's not normally a problem until I try to do seed bead work and then the tough nylon beading thread always finds its way into that notch and most of the time it causes the nail edge to split down towards my thumb. Recently, like a couple of days ago, I had this happen and I thought I'd take care of it before it got worse or before it got painful. I've tried bandaides before but they're awkward and it's hard to do bead work with a bandaide wrapped around the tips of ones thumbs. I recalled hearing that some ladies used super glue to help hold a cracked or split nail into place until it grew out but this was a little different since it was right down the middle of my nail. Anyway I devised a plan, I found some gauze and carefully cut it to fit the top part of my thumbnail and then I glued it down with a healthy dowsing of instant glue (Loctite 454) . When it was dry I coated both nails with clear nail polish and thought I was all set. It was the next day as I was washing some dishes that I realized that one of the make shift nail splints had come off in the wash. No problem, I'll just reattach a new one.


The first thing I did was take nail polish remover to remove the clear nail polish and any traces of the old 454 ... OMG ... the upper part of my thumbnails have dissolved. No joke, the glue had etched half way through the nail and I could see and feel a very distinct line where the healthy nail is and where the nail USED to be. Insert very strong curse words here and a whole lot of them !!!


Now instead of a week or two to wait for the split to grow out I will have to wait 2 or 3 months for half of my nail to grow out. Yeah this HAS to rank right up there with some of the dumbest things I've ever done.
Related Posts Plugin for WordPress, Blogger...