

Recently I saw an amazing beaded bead on BeadsForBrains365. Mandy gave the web link http://manogyongyei.blogspot.com/2009/01/sultan-bogy.html where she had found the pattern, only the instructions were a little sketchy and also in Hungarian. Did I mention that I don't speak Hungarian, let alone read it ? Searching the web, I took note that there were a number of people that wished to make this same bead but had no luck with the Hungarian instructions ... soooo ... I sat down and tried to walk my way through the sketches. After much trial and error this is what I came up with.
I hope it will help those who, like myself, could not understand the Hungarian instructions or had difficulty trying to decipher exactly where the path of the threads went in the sketches. I've also discovered that drawing diagrams of beads and thread paths is exasperatingly challenging. My hat's off to those intrepid souls who write tutorials.

Due to the length of my instructions I will post in 2 parts.
Materials List :
Beading Needle and scissors
Beading thread (Fireline, Nymo etc.)
Seed Beads size # 11/0 (round seed beads work best)
16 Round Beads size 4 mm
8 Round Beads size 6mm
About thread ... I prefer Nymo but please feel free to use whichever thread you're most comfortable with. Since this bead does require some rigidity I recommend that you use a fairly thick thread . In my version I used Nymo #D and though I used it single strand I did wax it. I cut my thread at 2 yards length and it was more than sufficient.
Row 1.) Pick up 8 seed beads on needle and thread them to within 6 or 8 inches from end of thread. Go back through all 8 beads to form a ring coming back through the first bead strung.

Row 2.) Pick up 3 seed beads and pass needle back through the same bead in your foundation ring This forms a little picot. Picture below.

Pass needle through the next bead in your ring (picture above) and now pick up 2 seed beads (the 2nd bead on your needle will be the center bead of the next picot made). Go through the side bead of the 1st picot made (picture below) and then back through the foundation bead (notice that you now have 2 picots formed). This is basically a Right Angle Weave.


Pass needle through the 3rd bead in the foundation ring, pick up 2 seed beads and repeat the previous step of going down through the newly form picots side bead and back through your foundation bead, then through the 4th bead in your ring. Continue in this fashion until there is only 1 foundation bead remaining.
Now pass needle through this foundation bead and UP through the side bead of that very 1st picot made. Pick up 1 seed bead and go across to the last picot made and pass needle down through the side seed bead and then back through the foundation bead forming the finale picot and joining the second row.


Row 3.) Row three will begin the sides of the beaded bead and will start curving the bead downward. Pick up one 4mm bead, 1 seed bead, one 6mm bead, 1 seed bead and one 4mm bead. Pass back through the seed bead that your thread was exiting from. See picture below.


Repeat this pattern until you reach the last remaining picot, here you will pass through that picot which I will call La Ultima.


Beading thread (Fireline, Nymo etc.)
Seed Beads size # 11/0 (round seed beads work best)
16 Round Beads size 4 mm
8 Round Beads size 6mm
About thread ... I prefer Nymo but please feel free to use whichever thread you're most comfortable with. Since this bead does require some rigidity I recommend that you use a fairly thick thread . In my version I used Nymo #D and though I used it single strand I did wax it. I cut my thread at 2 yards length and it was more than sufficient.
Row 1.) Pick up 8 seed beads on needle and thread them to within 6 or 8 inches from end of thread. Go back through all 8 beads to form a ring coming back through the first bead strung.


Pass needle through the 3rd bead in the foundation ring, pick up 2 seed beads and repeat the previous step of going down through the newly form picots side bead and back through your foundation bead, then through the 4th bead in your ring. Continue in this fashion until there is only 1 foundation bead remaining.
Now pass needle through this foundation bead and UP through the side bead of that very 1st picot made. Pick up 1 seed bead and go across to the last picot made and pass needle down through the side seed bead and then back through the foundation bead forming the finale picot and joining the second row.


Pass needle back up through the side bead in the 1st picot made in row 2 (See picture above), and then through the center picot bead. (See photo below).


Bring need through the center seed bead of the next picot and pick up one 4mm bead, 1 seed bead and one 6mm bead. Go down through the seed bead and the 4mm bead in the previous group of side beads formed. See picture below.


(Photo #17) Bring needle up through the 4mm bead and seed bead of the very first group made.Pick up one 6mm bead and (Photo #18) go down through the seed bead and the 4 mm bead of the last group made.

This newly added 6mm bead joins the row and completes the pattern of row 3.
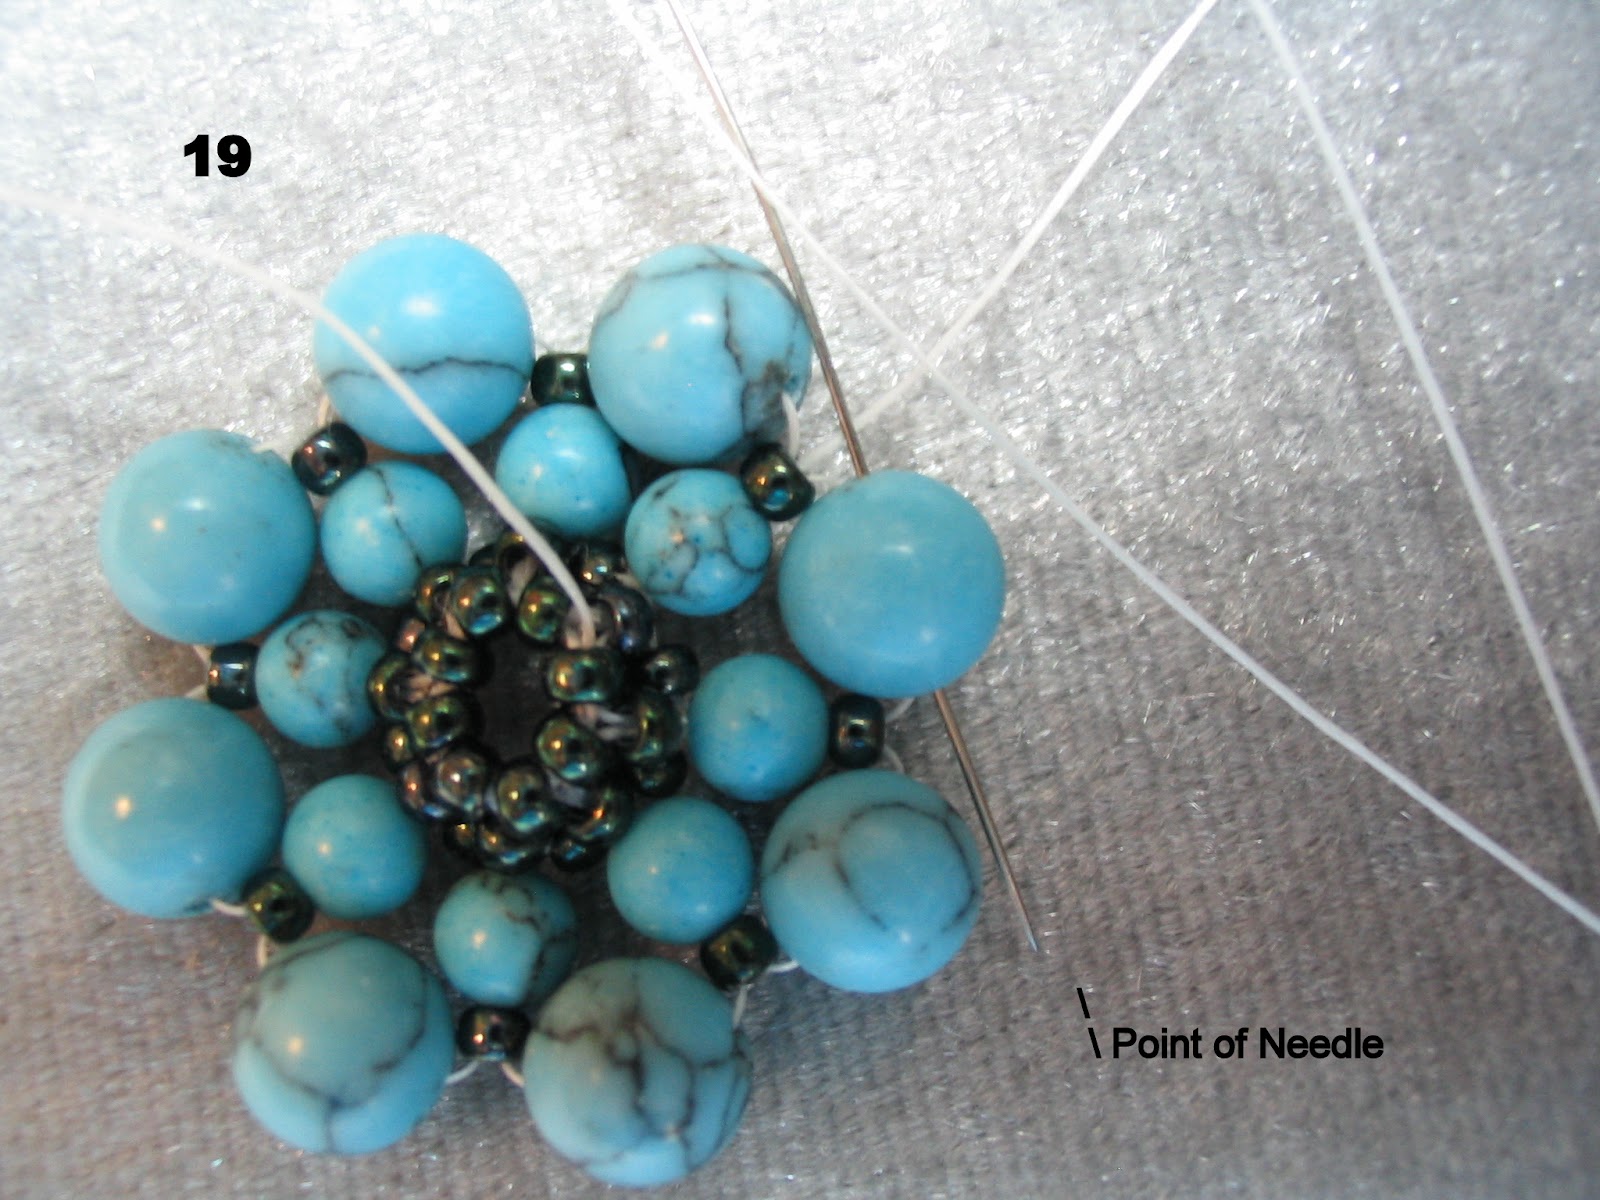
(Photo #18) Pass needle through La Ultima seed bead and up through the 4mm bead and the seed bead in the first group formed in this row. (Photo # 19)

Now pass needle through each of the 6mm beads to bring them together. (photo oops two #19's, it's been a long day ! See photo below)
AT THIS POINT WE'RE OVER HALF-WAY COMPLETE. I will post the other half of the tutorial tomorrow as this one is getting rather long. Hope you'll check back.


OMG! You are awesome! This is great - I guess you don't need to know Hungarian!
ReplyDeleteHappy Sunday- and Thanks so much for that idea! XOXO
This is beautiful! I have been wanting to learn this technique and will have to give it a whirl!
ReplyDeleteThanks so much for popping by my Blog for a visit!
LuLu Kellogg
Stunning! I LOVE beadwork.
ReplyDeletePearl
p.s. You live in Bradenton? Do we know each other? I've only been to Bradenton Beach like five times in the last year!
WOW...Not only a test in patience but skill as well -- that bead is gorgeous. I would stab myself at least 200 times trying to create something like this! Your tutorial is phenomenal though, for anyone just learning how to bead a bead it would be the perfect reference guide! I'm tweeting it now :-)
ReplyDeleteThis is Jenn btw :-)
Looks great! You should send your translated version to the designer so she can hand it out too. I've noticed that some of the foreign beader's are grateful if you translate their patterns into English.
ReplyDeleteMandy that's a lovely idea and I will do so. :)
ReplyDeleteThis tutorial is fabulous! I wish some book designs were written as well. Thank you so much for posting - I'm going to try to do this bead on Saturday! *hopefully it ends up better than my last beaded bead :)
ReplyDeleteShore Debris - If you do have the time this weekend to try out my tutorial, please let me know what you think of it. Was it easy to follow ? Do you have any suggestions to improve it? Were you able to complete the project without difficulties ? I'd like to hear feedback from anyone whose given my tutorial a try. :)
ReplyDeleteAs you can see I am finally catching up! I would someday love you have your e-mail or exchange phone#'s so that we can laugh and bead together!!!!
ReplyDeleteThank you!!!!!!!!!
ReplyDelete