Friday, May 27, 2011

A Glutton for Punishment Part II


In truth I had placed my last blog posting into drafts until I had completed this complicated necklace as there were many days between where I left this project and its ultimate completion.
As was mentioned in my last post, I'm either a glutton for punishment or crazy as I put a small fortune and way more time than I should have into creating this piece. In the previous installment of "A Glutton for Punishment" we left my black and white project at about this point in its progress towards completion (see Photo below).
  Photo below...Since then much has been added.
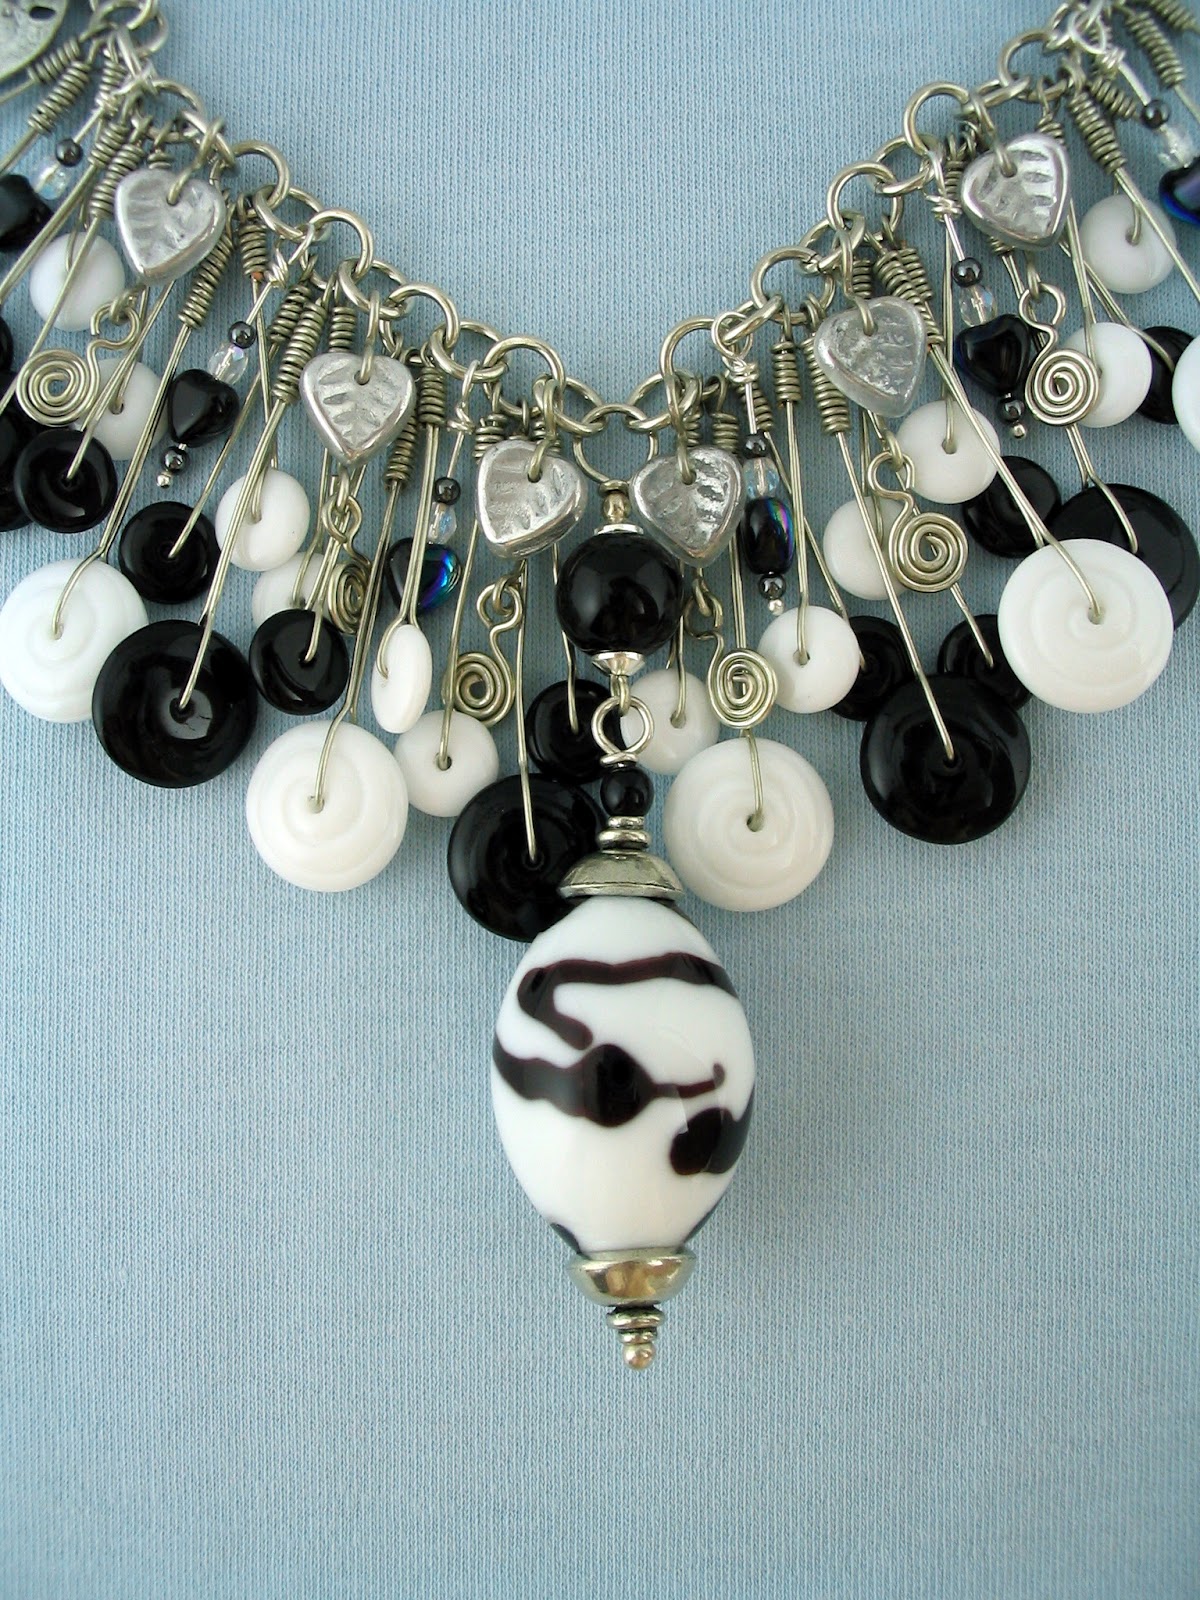
I decided to use the sweet little, jet black glass hearts as single dangles instead of coupling them with the silver glass leaves. If you look closely you might be able to see the jet hearts topped with tiny 3 mm firepolished crystals and micro 2mm beads of hematite. Instead of the black glass hearts the silver leaf dangles received small swirled wire charms that I made myself (see photo below for close-up). It worked out well, or at least I'm satisfied with the results.

You probably don't remember (I certainly didn't expect you to that's for sure) that I mentioned my project had to be put on hold yet another time as I required some type of link to add the side of the necklace. Not just any old link, I needed something special and found it in this hammered textured rhodium finished oval link. Perfection !!!

Personally I like the way this link helps tie the elaborate center section to the sides of the necklace but I realize this is a matter of taste.
 
The other side is attached by way of a link that I made using a large black glass bead and a couple of pretty bead caps, making sure that the wire loops were sufficiently large. A sand dollar charm was added as a counter weight to the large link and as an element of interest.

This side of the necklace also sports some whimsical hand coiled spirals and an assortment of stacked or capped black and white beads.

 
The side with the spirals, ends with a hook style clasp that I made using 20 gauge wire (doubled) and embellished with a complimentary black (slightly wire wrapped) bead.
 
The other side of the necklace features a fair sized cable chain to accommodate the clasp. A cute teardrop white bead is used as an end to the extension chain and is adorned with contrasting black beads and that really cute bead cap (love these caps!).

Photos below show the completed necklace.  Perhaps I fell into Alice's rabbit burrow and went a little too far with the whimsy but to be honest this piece never truly followed my carefully drawn plans, instead it seemed to tell me what to do and, even though it was a long time in the making and created a lot more work than I ever imagined, I'm grateful that I listened to it. 

Unfortunately the stacks of black beads look like one continuous bead in my photos, I tried making them (the photos, not the beads) lighter and though that made the individual beads recognizable it also washed out everything else  ... so I settled for what appears to look like big long black beads which are in reality really either 3 to 5 beads stacked together.  Ah the joys of photography.


Thursday, May 26, 2011

A Glutton for Punishment Part I

I'm not sure if I'm just a glutton for punishment or just plain crazy ! I tend to underestimate my future projects and start out thinking they will be small and manageable however they always end up becoming big, complicated and time consuming.
Several posts back ( Trouble Getting From Dream to Reality )I gave you a glimpse of a vision that I had of a black and white piece. It was a vision that danced in my head like those proverbial sugar plums in the poem "Twas the Night Before Christmas".   But what a challenge it has been, seems I never had just the right things that I needed such as strong enough jumprings, ones that wouldn't come open as soon as the necklace was picked up. So I'd order parts, wait for them to arrive, then sit down and with anticipation of completing the project dive back into putting it together. Part way through it would dawn on me that something was wrong and guess what ? ... I needed something else that wasn't in my vast supplies of beads, findings, wires and parts. SHOOT !!! DRAT !!!  And Double Dang-it !!!
So have to go look around,  find what I think will do the trick, place an order and wait some more.
Photo above..Lovely black and white Venetian glass oval bead will be the center focal point.  Only as the more I worked on it I realized that 1 - the center focal point was being buried beneath the disc bead dangle and 2 - my handmade jumprings,  made from 20 gauge silver plated copper wire, kept coming apart. 

Finally I did manage to put together the center area of the necklace and it has turned out far more complex than I had ever imagined. The heavy weight 18 gauge jumprings from Jewelry Supply that I ended up purchasing are performing well and I haven't had any open up on me yet. Yay!  Unfortunately I've just about used them all in this project and decided to order some more from a different vendor ... the new jumprings are not nearly as nice nor as strong so it's true that sometimes you get what you pay for.


Photo above ... Been busy as a bee wire wrapping black and white disc beads to use as dangles. I decided to add a larger solid back bead for the Venetian bead to hang from as the black and white oval bead needed to be longer. Yes, it's filling in nicely but still needs something.

Photo below... How about some of these Czech pressed glass leaf beads with a silver finish ?  Might add the tiny black hearts as dangles just below the leaves ?


Photo below ... As you can see I added a large black bead at the focal center to make the Venetican oval bead hang lower, it was being hidden by all the black and white disc bead dangles.  Hmm and those lovely little jet black glass hearts that have one side with an aurora borealis finish ?  Well they didn't look so hot as dangles hanging WITH the leaves so I may add them as dangles on their own ... not sure at this stage.  Besides I now need some type of large, fancy link to attach at the side of the necklace. 
Photo below ... As you can see I've attached a few of the silver leaves but it still has a lot of fill work left to be done and there's still the problem of what to add to the loops that I created beneath the silver leaves ... the loops I made to hang the sweet little black glass hearts from.
Stay tuned for Part II as things may change ... oh undoubtedly they will change!

Friday, May 20, 2011

Staying South for the Summer

We have some new neighbors next door to us, a couple of snowbirds who've decided to stay south for the summer. Perhaps they don't mind the Florida heat and humidity ?

This pair of Canadian Geese have taken up residence in our neighbor's pond. It's not a very large pond but these lovely birds don't seem to mind.


To them it's Home Sweet Home, or at least during the daylight hours, at dusk they seem to disappear and I'm not sure where they nest at night. However they are very protective of their "home" and this "outsider" has not been allow to come into the pond. Perhaps with time it will be welcomed but until then it can only watch from the banks of the pond.


A few days ago a flock of these large water birds flew over, there were about 6 of them in all. The flock honked and made quite a racket as, on several occasions, they attempted to land. However the residing Geese couple would not hear of it, they protested loudly and told the flock, in no uncertain terms, to "Get Lost!" I'm sure they realized that their little pond could only accommodate a limited number of water birds and they weren't and aren't willing to share their domain.


Photo below... a pair of duck paddle around the circular pond and are quickly confronted by the possessive Geese.


Hey ! Who invited you ?

No!  This is OUR pond, you two will just have to leave.  Here allow us to escort you to the exit.
Of course the water level in this little pond is starting to drop as we've not had much precipitation in a few weeks. Hope we get some good rains this summer or these two very possessive geese will be waddling in a mud hole rather than wading in a pond.

Saturday, May 7, 2011

Hallelujah ... Another Project Completed !

Not long ago I lamented that I had purchased some foil glass pendants which did not meet my standard of perfection and was trying to figure out what could be done with them. 

I received a number of good suggestions one of which came from  Moonlitfantaseas   who recommended that I make a seed beaded bezel  to go around it and conceal the flaw.  So I beaded a bezel AND a bail for the pendant (yes I could have just used the hole that was a part of the glass pendant but I tend to make more work for myself than is necessary. LOL).  All this was done with tiny little 11/0 Delica beads and minuet 15/0's ( I was cross-eyed for 2 days afterwards).
Since I can't seem to leave well enough alone I then embellished the bezel with firepolished Czech glass beads and an assortment of lovely freshwater pearls.  

The swirls of copper and silver foils embedded within the glass pendant reminded me of   galaxies or a cosmic nebula so I named it "Pearl Nebula".  If you think of a better title please feel free to leave it in a comment and I will certainly consider changing the name.

Next I beaded a rope necklace using crystal seed beads with a copper lining to match the tiny beads that were used to construct the bezel with.


The Herringbone beading pattern consists of over 550 size 8/0 seed beads in copper lined crystal and Straw Gold with an aurora borealis finish.   Naturally I didn't have any end caps or cones that would fit this rope and when I tried making my own seed beaded end caps it made the rope so thick at the end that it would not fit through the beaded bail of the pendant.  OH BOTHER !  Fortunately I found these pretty antique brass flower end caps at Ornementea, they fit perfectly and look so feminine.

The end flower end caps are topped with solid copper beads that match the copper in the seed beads nicely, to this I've added my handcrafted extender chain constructed with Swarovski adorned wire links and 10 mm jumprings.  At the ends I've added my own handmade hook and eye clasp.
I think it came together well.  In this photo I had to pull most of the rope necklace back in order for the pendant to rest on the flocked display bust.

Monday, May 2, 2011

May? Already?? ....Where did April go ?

I can't believe how much time has passed since my last post.  Wish I had a valid excuse but none comes to mind ... other than busy or forgetful!    Oh! and then there was the Royal Wedding that kept me totally preoccupied, couldn't pry myself away from the TV.  Kate was absolutely an angelic beauty, loved her gown. The couple seems to be deeply in love and, as everyone else, I wish them a long and happy life together.

As far as anything new, well the kitchen tile work is done and  I could not be happier with the results.

Photo above...Gives me something to look at while slaving over a hot stove.  :)
Photo below...The damaged drywall was repaired and now, with the new tile, this corner looks so much nicer.

 
Photo above...All my new space for the old coffee pot and ....
Photo below...and the single serve coffee brewer (the culprit that started this whole remodeling).


Sorry about the angle on this photo I was trying to avoid my shadow but it is still in the photo.  A good photographer I am NOT.  LOL   Oh well I'll just enjoy the wonderful photos of  others such as Aly at AlyGator's Everywhere, Annette of So Many Memories , Tash of Palos Verde Daily Photo  and dear, wonderful T at Poppy Place PDX.

Thursday, April 21, 2011

Perfection is a Problem


Perfection is my problem but that's a story for another time.  Once again I had a vision, I knew just how I wanted the out come to look like...well pretty much anyway.  At first I played around with the beads and findings getting a feel of where I wanted to go and then I sketched out what I thought it would look like. 
This design allowed me opportunity to use my new wire coiling tool, unfortunately the smallest mandrel that came with my tool was too thick to make all of the springs that the design required so I would have to improvise for the tiniest coils. 

Everything looked well until I actually began putting things together.  It was like driving in a section of town where you've never been before, you think you want to go straight down 1st street and turn left on 2nd avenue, only 1st street does not connect with 2nd avenue and so you go round and round trying to get from 1st to 2nd.

Originally I had intended to use the large 7 mm jumprings (see photo above) to attach the 3 coils and their spacer beads directly to the earring however when I placed everything onto the jumprings the coils stuck out at rather ridiculous angles.  So the hunt for 2nd avenue began!  I decided the coils and spacers (which are tiny - 3mm x 1.5mm - sterling silver flat rondell beads) needed some type of straight object to hang from. 
Well I went down one street and up another and after a couple of different attempts came up with the combination shown above.  A sort of triangular bail that I constructed out of 20 gauge wire and embellished with gold plate wire coils (also handmade by me).  These were attached by way of that hefty 7 mm jumpring to the loop of the earring.  Rather indirect route but now that it's done I find I like the effect even more than the original plan.
Would you like to see more ?

I made all those little coils (or springs) myself, some required the use of a piece of 20 gauge wire as a mandrel in order to get the inner hole small enough and were made with 26 gauge wire so as not to overpower the effect I was striving to create. 
The dark gray beads are hematite capped with tiny silver plated bead caps and threaded on to gold plate ball tipped headpins.
Right now I'm debating whether to list them on Etsy or place them in a local gallery.  I'll probably decide upon the gallery as I find my jewelry sells best where people can actually pick it up and see it, as they say; "up close and in person".  :)

Friday, April 15, 2011

The "Adjustment" continues

I really haven't forgotten about my kitchen "adjustment" that was started ...well, let's just say it started some time ago.
Our counter-top man, Nick Formica, was indeed able to salvage the 2 old pieces of solid surface quartz, counter-tops and meld them into one piece to fit the new work space that we created.  They did a great job considering that they were working with 2 different sections and I can hardly see where they seamed the two together...oh it's there but I have to really look to find it, so I don't really look.  :D  Now we have a bit more elbow room to brew our java (or tea) in.

Photos above and below...this space used to be only about 10 inches across, but since we switched the oven cabinet with the drawers cabinet that had been on the opposite side of our oven, we've gained another 30 inches. Yea !!

Unfortunately the project is not totally done as we decided... ahem, make that I decided...that I wanted a tile backsplash.  You really can't blame me as this tile is all too easy to fall in love with, I can envision it on the wall behind my range. 

How pleasant will it be to gaze on a  country scene of Tuscany as I stir a pot of spaghetti sauce ?  Since we had a section of quartz backsplash that had been on the wall previously, those sections had to be removed.  What a mess it made of the walls but the tile person says that's no problem.  He assures us he will patch it before installing the tile.


So now we're waiting on the tiles to come in.  Meanwhile I can dream of these.


The tiles have a precious matching border of boughs of olives but it would have cost us almost $300 more for the border...I think I can live without it...sigh...how nice it must be to have a life where money is no object, well maybe some day. :D
Related Posts Plugin for WordPress, Blogger...